So, you have Windows 10 installed on your computer and now you want to make sure that your music library works correctly. We’ll try to do our best to walk you the process of installing iTunes on the new operating system, but, at first, let us draw your attention to some fair warnings.
ITunes can be rightly regarded as one of the most capricious Windows programs ever developed. It tends to take over your PC and doesn’t give up until everything works perfectly. It is definitely not one of the programs that promptly switch services. Double-clicking on anything within iTunes can lead to freezing issues and other manifestations of odd behavior of your computer. Moreover, keep in mind that along with iTunes you get another Apple video-playing program, QuickTime, automatically installed on your PC. Therefore, it is necessary to carefully stick to the installation instructions to get your Windows 10 PC properly iTuned.
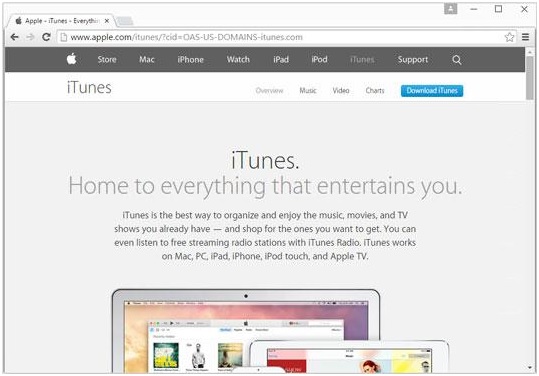
First, you will need to open your favorite browser and go to iTunes. Don’t worry if Apple official site redirects you to another page, you will wind up in the right place anyway.
By the way you can get download iTunes for Windows 10 for free from Windows10portal, as well.


You next step will be downloading the program from the site. To do it, it is necessary to click on “Download iTunes.”
Please, note that you may be prompted to subscribe to different stuff including updates about services, special offers, etc. If you are not eager to keep abreast of Apple’s novelties, don’t hesitate to uncheck the appropriate boxes. Also, we recommend that you refrain from typing in your email address. So, you may just skip this step.
After that, you will need to press “Download Now” button. There are two iTunes version available, but you don’t have to worry, since your browser will automatically launch the download of the appropriate version, either 32- or 64-bit. You will also see some messages in standard splash screens asking whether you want to run or save the new file on the computer. Opt for “Run” and wait for download to complete. It may take a minute or two, depending on the speed of your Internet.
Once the download is complete, you may proceed to installing iTunes on your new operating system.
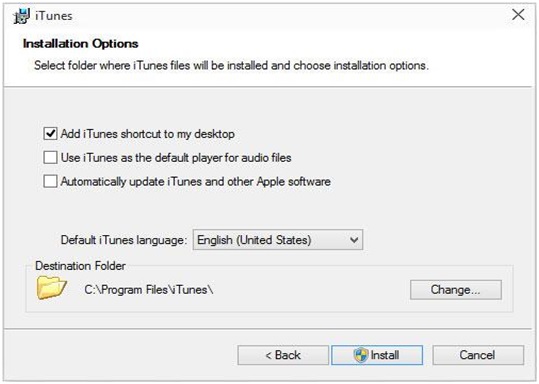
You will see the Installer options, then. It will be necessary to select the folder where the program files will be installed and click “Next.”


We highly recommend unchecking such boxes as “Use iTunes as the Default Player for Audio Files” or “Automatically Update iTunes and other Apple Software” to avoid downloading recommended but useless programs in the future and minimize the risk of iTunes’ incorrect operating.
Probably, you know that in the past, Apple used the update permission to trick users into installing their new programs that subsequently appeared on the desktop and littered it with numerous icons. Moreover, selecting iTunes as your default music player is fraught with such undesirable consequences as delays in playing music after clicking on a song.
Once you are done, click “Install.” After a short video ad, you are expected to see a message congratulating you on successful completion of installation.
Tap “Finish” and try using you new program.
Apart from this, if you still face any problem then contact iTunes support phone number for any kind of solution.


