Pandemic set the stage for the ‘Self Care’ movement. When all the barber shops, hair and nail salons had to be closed down, it made people resort to their own ingenuity to take care of their regular bodily needs and maintenance. With more home and family time on their hands, people got a chance to pay attention to their body and looks. Gave people a goal to transform their looks before the things get back to normal or attend the next big social event. And who, doesn’t want to look well put together for any social events? Since this pandemic slumber is slowing fading all round the world, it is estimated to see a rapid growth spurt when it comes to social events (especially weddings!) in this current and upcoming year. So, it’s time to finally rock that outfit, those shoes and the makeup you bought off in pandemic-binge-shopping-spree. But, wait a minute, what about your nails? A great outfit demands great nails. Book an appointment may be at the nail salon? Sorry you’ll be out of luck since those salons will be over booked for this and the next season. Now, what do we do? Well, look no further, here is the solution to all your manicure problems. The UV Poly-gel Nail Kit. Its easily on major online shopping apps. Best thing about this product is that it is now available in most parts of the world and not only that, the sales numbers are gaining traction.
UV poly-gel nail extension kits are selling like hot cakes. This product is a good investment, as it will save you tones of trips to nail salon.
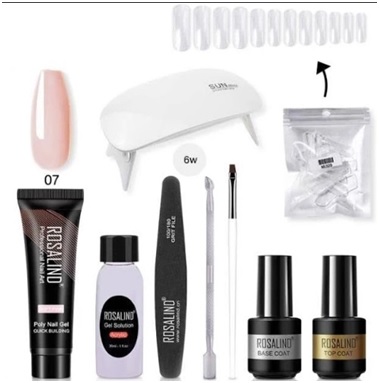
Packaging: This Nail kit comes in the thick white box with the nail kit brand name. All the required accessories are carefully packed in the little plastic pouches. The kit comes with 12 components as follows:
- Fast building Poly-gel nail tube- 2 shades- Transparent and nude shade.
- Primer
- UV base coat
- Top coat
- Slip solution- monomer
- False nail tip forms- You get about 50 of those from smallest size to the largest. Great for all women.
- Nail file
- Cuticle pusher
- Nail brush
- UV Lamp
- Plastic Clips
- Clitter powder container.
Steps to create amazing nails:
- File your natural nails to create a smooth surface. Create a better adhesion contact surface with poly-gel.
- Use cuticle pusher to push back cuticles skin, do it in a way so as to fashion a proper curve for build-up gel.
- Now apply a thin layer of UV base coat on nails as the initial preparation step and cure it under the UV Lamp for 1 minute.
- Select a suitable false nail tip as per your finger size.
- Now take the nail brush and wet it with few drops of slip solution(monomer). Squeeze a pea size glob worth of poly-gel product from the tube, and transfer it onto your preferred nail false tip. Start spreading as per your desired length by applying gentle pressure. Wet the brush with monomer when necessary. Try to spread it evenly along the nail forms.
- Stick it your finger nail and adjust it until it feels firmly stuck to your finger nail. Use the plastic clips to secure the nail tips on your finger. Now cure it under the UV Lamp for 3 minutes. Since the clips are transparent, they cause no issue when it comes to curing the poly-gel.
- Use the smaller end of the cuticle pusher to gently remove the nail form. Trim the access and file it as per your desired nail shape. (Almond, Coffin, Stiletto, Rounded or Square)
- Apply gel top coat and cure it under the UV Lamp for 2 minutes.
- This step is completely up to the user, you can stop at the step no 8, or further design your nails with colored gel nail polish or rhinestones or glitter to achieve the desired outcome.
Pro Tip:
Consider applying a cuticle oil /lotion after the entire process, so that they retain their shape the next you decide to repeat the process.
Usage:
Although the steps at first might seem a bit too much, but it’s easy to get the hang of it once you complete the step for a single nail. One single nail requires about a minimum of 6-7 minutes, if you follow the step right. To complete nails of one hand, it will take the user about roughly 30 mins.
Longevity:
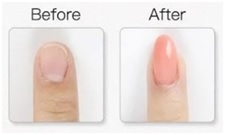
This Nail extension can last up to minimum 2/3 weeks, taking in account the rough usage while doing everyday chores. They stick firmly to your fingers, almost making they feel like natural nails. 2 weeks adhesion is impressive considering, we mostly get such nails for special occasions. Beneficial for busy individuals in the glamourous industry (or professions that require long nails). These nail extensions drastically change the look of hands and add to your overall look.
Pros:
This Nail Kit costs around Rs1000/- to Rs2500/-, it might like splurge for this one product for one, however this product is one time investment.
Travel friendly, all these components fit very well in your average size travel pouches.
Since its travel friendly, you can do your nails on the go.
Cons:
The steps can be a bit tricky to follow for new beginner.
Slightly time consuming, if you’re a newbie and don’t the hang of it.
Final Verdict:
All in all, this product is great addition to your selfcare arsenal, due its mobility aspect. Anyone can do their nails anytime and anywhere. Most beauty salons have similar kits and charge exorbitant amount for a single sitting whilst making one wait for hours for their appointment. This kit is good option for women in glamour industry as well flight attendants where overall looks play a major role in the profession. This kit is also great for stay-at-home moms, great way to spend one afternoon looking after their selves. This can be an excellent gift option from teens to even women in 50-60s. Steps are easy to follow once you get used to it. Lots of videos available on the internet to guide you through the product. This product is world-wide approved and tested.
About The Author
Sneha Kadam
Sneha Kadam is a freelance content writer, with a keen interest and knowledge in topics such as Art, Architecture, Astrology, Health, Fashion, Movies and travel. Loves presenting her abstract views on her blog.


